What to do first when your plant arrives
Unbox your plant
Your plant has spent the last few days cooped up in its box—it needs fresh air and some time in the sun to rejuvenate (can’t you relate?). Get your new plant out of its box and remove any zip- or twist-ties and any plastic wrapping as soon as you can. If any soil fell out of the pot, go ahead and toss it back in for good measure.
Sunday Tip:
Bare-root plants should be left in their baggie and kept moist until you’re ready to plant!
Water your plant
Your plant will likely be thirsty after its journey. Check the soil for moisture and, if dry, give it a good drink. Water thoroughly until water drains out the holes in the bottom of the pot. If you are using a water meter, insert it into the pot to monitor water levels until you’re ready to plant. You can even use it outside once you transfer your plant into a garden bed or container garden.
Allow your plant to acclimate
Your plant has traveled a long way, and the environment in its new home may be much different from where it grew up. To prevent shock, let your plant recuperate for a day or two outside, somewhere with mild temperatures (60-75°F) and away from direct, hot, middle-of-the-day sun. Then you can move your plant to its new, more permanent home.
How might your plant look?
On the small side
Many shipped plants are smaller in size - this makes it easier (and less expensive) to mail, reduces stress on the plant, and allows your new plant to grow into its own once it gets to it’s permanent home.
Pruned or leafless
Depending on when plants are shipped, they may arrive pruned or without any leaves. Don’t worry! Many growers prune plants (particularly trees and shrubs) before mailing or purposefully mail when leafless to prevent damage during shipping and to encourage root growth the first year after planting. This is actually better for long-term plant health. If your plant does have leaves, some might drop off during shipping, but that’s normal. Your plant will start growing again after it’s planted.
A little root-bound
Your plant’s roots may also be a little snug when they arrive.
- Herbaceous plants: When you’re ready to plant, remove from the pot and wiggle your fingers gently in the bottom of the root ball to loosen the roots before placing your plant in its new home.
- Trees and shrubs: Before planting, make four or five ¼ to ½ inch deep slices through spiraling roots. This will encourage new root growth and prevent roots from strangling one another (and killing your plant!) as they grow.
White spots
Your plant might arrive with some white speckles on the leaves. If these look like water spots, it’s likely salt residue from irrigation, and should wash off with some rain or water. If the spots look more like someone sprinkled baby powder on your plant, this might be a sign of powdery mildew. This is mostly a cosmetic issue, and shouldn’t cause any real damage to your plant as long as you get it some fresh air.
Stressed out
Remember, your plant is a living thing—and it just spent several days in a dark box. Give your plant a little time and TLC. It should bounce back and start growing again soon.
How to solve common new plant issues
What do you do if you unbox your plant and it looks less than vibrant? Follow the tips below to get your plant back on track before planting.
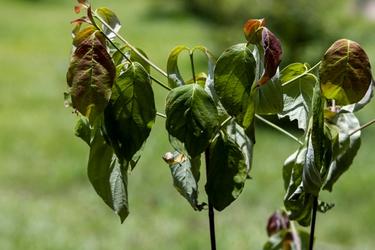
Wilted or limp leaves
Your plant is probably just a little hangry (we’ve all been there). Get it some sun (food!) and water, and it should perk back up after a couple of days.
Broken branches, lacerated leaves, or ripped-up roots
Sometimes things can get a bit cramped in those boxes. If you have any broken branches or roots, trim those sections off with clean shears, removing as little plant tissue as possible. Leaf damage is usually cosmetic, but if you see any brown or discolored areas along the tears, go ahead and remove those leaves.
Sunday Tip:
Use a light touch with your shears. Your plant is recovering from the stress of shipping, and removing too much of its tissue could shock it. Remember, those green leaves are your plant’s meal ticket - they’re what produce the food, so don’t trim more than necessary!
Yellow or brown leaves
Color variations may be normal for some plants, or might be a sign of something harmless, like your plant adjusting to the stress of travel, or older leaves just naturally aging. On the other hand, this might also be a sign of a nutrient or water deficiency, or even an insect or fungal issue, so it’s important to investigate.
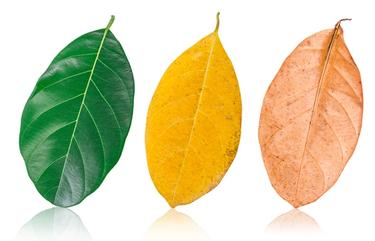
Yellow leaves
Check leaves for insects. Identify and remove or treat infestations, if necessary. If no insects are found, your plant may just be ready to get out of the pot and stretch its roots. Plant as soon as you can, and fertilize appropriately.
Brown, crispy leaves
Check the soil to see if it’s dry, because your plant might be thirsty. Give your plant a good soaking until you see water draining from the bottom of the pot.
Brown, mushy leaves
Wilted leaves with dark, soft spots could be a sign of cold damage from shipping. If you suspect this is the problem, focus on immediately getting your plant to a warm spot in the house, or even on a heating mat.
Sunday Tip:
Sunday only ships plants when they’re ready to be planted, which eliminates a great deal of this risk!
Yellow shading around brown spots
This might indicate a fungal issue. Remove and dispose of infected leaves, and be sure to sanitize your garden tools to avoid spreading the disease to healthy leaves or other plants.
Ready to get your hands dirty? Check out our planting and care guides for tips and tricks to grow your green thumb and help your new plants thrive.